Overview
iProcess makes it easy to accept payments on your mobile device, whether you're keying in card details or using a supported card reader. With just a few taps, you can complete secure transactions, add tips, and capture customer signatures—all from your phone or tablet.
How to Start a Sale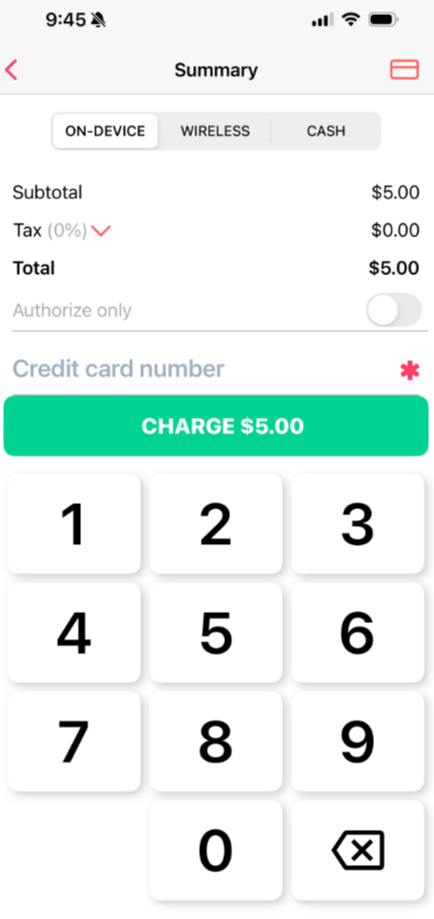
- Open the iProcess app
- Tap the Menu icon (three bars in the top left)
- Tap Start Sale
- Enter the sale amount and tap Continue
You’ll then choose how you want to accept the payment:
Choosing a Transaction Type
At the top of the transaction screen, you’ll see three tabs:
- On-Device: Use this for manually keyed transactions
- Wireless: Select this if you're using a supported card reader
- Cash: Record a cash payment (available if your account supports this)
Choose the tab that matches how you're accepting the payment.
Accepting Card Payments
Manually Keyed Transactions (Card-Not-Present)
- Select the On-Device tab
- Enter card number, expiration date, and any required details
- If you see any *Required fields in Customer Details, these are set up during onboarding the merchant account. They are the Merchant's Required Fields.
- Add customer email (optional)
- Tap Charge to process the payment
Note: Tips can be added before signing if the setting is on in the App. Surcharges will be added if the feature is enabled on the merchant account and if processed on a supported processor.
Using a Card Reader (Card-Present)
- ID Tech VP3350 (Bluetooth/USB): Follow the prompts after connecting
The app will prompt the customer to sign (if signature capture is enabled).
Adding Customer Information
You can enter the following customer and order details before submitting a payment:
- Customer name
- Address
- Email address (to send receipts)
- Phone number
- Order ID
- Order description
- Merchant-defined fields (if your account includes them)
If your Gateway account has the Customer Vault feature enabled, you can also choose to save the customer to your vault for future transactions. Make sure it's enabled on the App as well: Go to Menu → Settings → and toggle ON Customer Vault.
This information supports accurate recordkeeping, simplifies repeat payments, and enhances customer service.
Collecting Signatures
To enable signature capture:
- Go to Menu → Settings → Customer Signature
- Turn the toggle ON
If enabled, all transactions that are keyed directly into the app or swiped using a card reader with a headphone jack will prompt the customer for a signature. For transactions processed through a wireless Bluetooth reader, a signature prompt will only appear if the card itself requests it—regardless of this setting. iProcess will display a digital signature screen after the payment is authorized. The customer can sign directly on the screen.
Submitting and Confirming the Payment
Once the payment is submitted:
- You'll see a Payment Approved confirmation screen
- A receipt can be emailed, texted, or printed by selecting the Share icon (arrow) at the top right of the Receipt screen
- The sale will appear in your History tab
Tip: Always confirm the payment status before leaving the transaction screen.
Choosing the Right Payment Method
| Scenario | Recommendation |
|---|---|
| Card-present sale | Use a card reader for added security and speed |
| Card-not-present sale | Key in the card manually and verify all details |
| Cash sale | Use the Cash tab to track non-card payments |
Common Questions
Can I apply tips at checkout?
Yes. iProcess allows preset tip options (15%, 18%, 20%) or a custom amount when keying in a sale. Preset tip options cannot be changed.
What if my card reader isn’t working?
You can still process the payment manually by switching to the On-Device tab.
How do I know a transaction was successful?
You’ll see an approval screen and the transaction will appear in your History tab.